
1 . Go to PythonAnywhere.com, this website will allow you to code and host your website on the cloud for free (although there are limitations). Click on “Pricing & signup” to get started:

2 . Now click on “Create a Beginner account”:

3 . Fill out the information requested:

4 . Once You are registered, you should be redirected to the following screen:

5 . Open a “New console:” by clicking the blue button called “$Bash” into a new web browser tab:

6 . You will now have a “Terminal” to type commands into:

7 . Type in the following command after the “$” above. (I found this code directly from the PythonAnywhere.com help page at https://help.pythonanywhere.com/pages/DeployExistingDjangoProject )
a. mkvirtualenv --python=/usr/bin/python3.8 mysite-virtualenv
b. (The goal of this command is to create a “virtual environment”, it’s a place to keep track of all the programs that you will install to run your code. As an analogy, I think of the “virtual environment” like bringing a tool bag to a construction site, it’s a place where you can keep track of all your tools, so they are easily available and don’t get mixed up with your coworkers’)
8 . Now you will want to install the Wagtail CMS, which will give you the functionality to make your website without extensive coding. My understanding is that this is like installing WordPress but in the python programming language and is hosted for free by PythonAnywhere.com. Please enter the following line of code: after the “$” (The basis of the following installation steps is available at: https://docs.wagtail.io/en/stable/getting_started/tutorial.html

9 . You will now enter the following code to start your new website:
a. wagtail start mysite

10 . Now you will go into the folder you just created:
a. Type the code: cd mysite/

b. When that command resolves, type the following command: pip install -r requirements.txt
c. Type the code: python manage.py migrate
d. This will set up the database that stores the information you add to the site. You will see long a string of stuff happening in the terminal, but you should end up with this:

e. Type the code: python manage.py createsuperuser
f. The terminal will now ask you to supply information to create a profile to access the admin side of your new site. (The admin access is important, because this is where you will create all the content for your website.
g. Creating the super user is the last step that follows the outline in the screenshot in step 9.
11 . You will now check to see if everything is working correctly so far, type the command:
a. python manage.py check
b. You should see there are no issues, like the screenshot below.

12. OPTIONAL- But Recommended: go to https://docs.wagtail.io/en/stable/getting_started/tutorial.html . Within Wagtail’s tutorial there is more functionality that they will guide you through. Such as:
a. Creating a HomePage
b. Adding Tags
c. Building a basic blog
d. As well as documentation on adding more functionality.
13 . Next, we will type the command that that collects all the static items, into one folder, which allows your webpage run when it is deployed. (I was stuck here myself, being a newbie, I did not understand this. Most tutorials that I could find would only get you to the point of running the website locally on the computer. But I am taking this a step further because as nice as it looks, the website is useless if it is not connected the internet.)
a. Please type the following command into the terminal: python manage.py collectstatic
b. Following this entry, your terminal should look like this:

c. Please see above, the terminal has supplied us a path to a newly created folder that will hold our static files, save this path, you will use it in a few steps: /home/testcasewagtail/myproject/static .
d. (Please note, in this path you will see my PythonAnywhere.com username(testcasewagtail), your path should have your username in place of the one shown here in this tutorial.).
14 . We will now switch back to the first web browser tab, which is the dashboard for PythonAnywhere.com:

a. Please click on the menu link at the top of the page labeled, “Web”. Which will bring you to the following page, and select the button, “Add a new web app”.

15 . You will now click through questions, but it is simple to setup the app.
a. On the page below, click “Next”.

b. Now click on the last item, “Manual configuration (including virtualenvs)”:

c. Then click “» Python 3.8”:

d. Below, click the “Next” button (don’t worry about this message, I will show you what to enter).

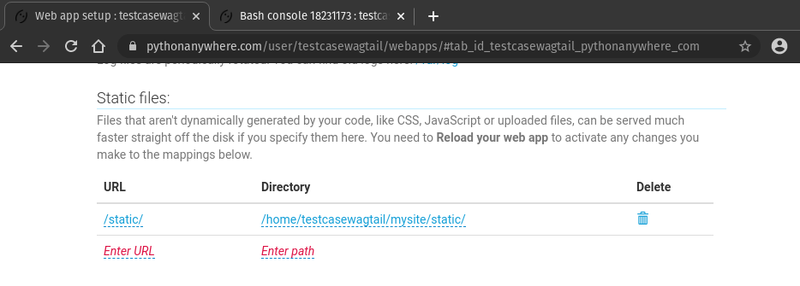
16 . Awesome! Now you will be on the Web app configuration page, and you will fill out a few items:

a. First you will find the section "Static files:” and enter the path that we saved earlier in section 12: /home/testcasewagtail/mysite/static/ (I have already entered it below, but remember to use your own path)
b. Now we will setup the code section. Please click on the link next to the label “WSGI configuration file:”:

c. You will be presented with a file that is already filled with information, but you will need to remove all the text in the file:

d. In this file, where you just cut all the text, paste in the following (Please note, the items highlighted in yellow will need to be updated with your username:
# +++++++++++ DJANGO +++++++++++
# To use your own Django app use code like this:
import os
import sys
# assuming your Django settings file is at '/home/testcasewagtail/mysite/mysite/settings/production.py '
path = '/ home/testcasewagtail/mysite’
if path not in sys.path:
sys.path.insert(0, path)
os.environ['DJANGO_SETTINGS_MODULE'] = ' mysite.settings.production'
## Uncomment the lines below depending on your Django version
###### then, for Django >=1.5:
from django.core.wsgi import get_wsgi_application
application = get_wsgi_application()
###### or, for older Django <=1.4
#import django.core.handlers.wsgi
#application = django.core.handlers.wsgi.WSGIHandler()

e. Update the section labeled “Virtualenv:” by entering the following path mysite-virtualenv :

f. Now go to the Account link at the top of the page, then choose API token, and click create token. Below is what you should see:

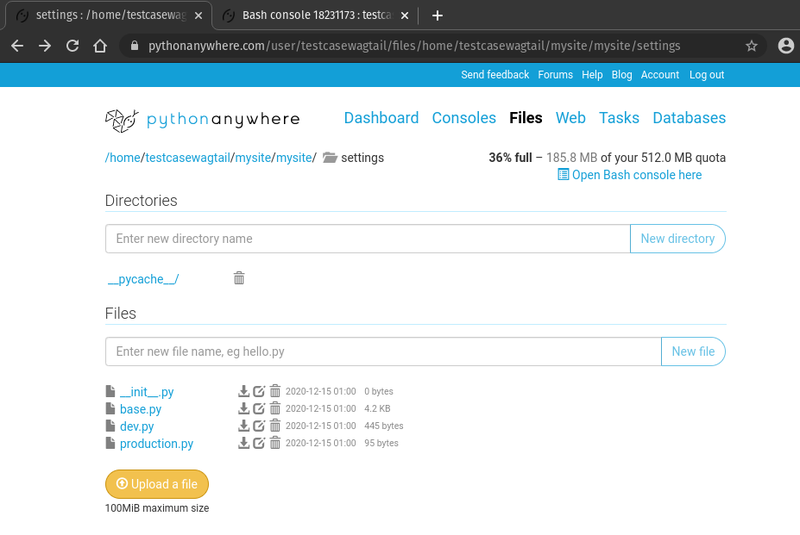
g. Now is the only time you will have to dig deep into the files. You need to update one specific field to be able to launch your website.
h. Go to the top of the screen and click the “Files” link, and click through the folders until you open a file named prod.py:

i. You should be clicking on the following directories in this order:
j. mysite/
k. mysite/
l. settings/
m. Then click on the file link named "production.py”
17 . You will see the following text when you open the production.py file:
a. The data here will not be enough, it is looking a file named local.py.

18 . We will go back to the settings folder and create file named local.py

19 . Now open the file named dev.py, we will take copy the data highlighted below, and paste it to the local.py file (when you paste it change your Secret_Key, please google the best practices):

20 . Save the update you just made and click on the menu and choose “Web”. At this point click on the green button that says “Reload testcasewagtail.pythonanywhere.com”. It should look like this:

21 . Now we should be all set, just exit out of your browser, clear your browser’s history, cache, and cookies. Then log back into PythonAnywhere and click the Configuration for link above. You will now be able to access you site.
22 . It should look like this (This is the default wagtail homepage):

23 . But the real power of Wagtail CMS is the admin area built on top of the Django web framework for python.
24 . This is accessed by going to testcasewagtail.pythonanywhere.com/admin. (Please note, you will need to update the highlighted part of the URL with your PythonAnywhere.com username.) You will see a welcome screen to login with the superuser created in step 10.d .

25 . After logging in, you now have access to add content and customize your website:

Below are some resources that are worth checking out, and helpful resources:
Wagtail CMS: https://wagtail.io/ ; https://docs.wagtail.io/en/stable/index.html
Django girls: https://djangogirls.org/ ; https://tutorial.djangogirls.org/en/
Django: https://www.djangoproject.com/ ; https://docs.djangoproject.com/en/3.1/
PythonAnywhere.com: https://help.pythonanywhere.com/pages/
Good training videos are available at: